
TLDR:
- Essential Tools & Materials: Treated lumber, insulation (foam and fiberglass), and drywall for a durable DIY finish. You’ll need a saw, framing nail gun (pneumatic or cordless), measuring tape, level and/or laser level, drill and/or Ramset Nail Gun.
- Plan the Layout: Measure carefully, sketch the wall design with doors and windows, and mark chalk lines to ensure alignment and code compliance.
- Attach Bottom Plates: Secure plates to concrete with Tapcon screws or a Ramset nail gun.
- Frame Around Obstacles: Measure pipes and beams, build around them with clearance, and add blocking for a stable, accessible frame.
- Build Door Frames: Pick a door size, construct a strong header, square the frame, and add trim for a polished look.
- Angle Walls (If Needed): Cut plates and studs at the desired angle, assemble with precision, and brace for stability in unique layouts.
- Insulate & Protect: Install tight-fitting insulation and a vapor barrier to control moisture and boost energy efficiency in your basement.
Introduction to Basement Wall Framing
Framing walls in a basement serves as a foundational element in transforming these often underutilized spaces into functional areas. The importance of properly framing a wall cannot be overstated, as it forms the structural backbone for further development, ensuring stability and alignment for drywall, insulation, and other finishing materials. Dramatically improving the livability of a basement can provide additional storage, recreational areas, or even cozy living environments, depending on homeowners’ needs.
Many individuals choose to engage in DIY projects, particularly when it comes to finishing a basement, as these projects not only allow for cost savings but also provide a sense of personal achievement upon completion. When considering framing basement walls, it is essential to understand the various approaches and materials that are available. Different framing techniques can yield varying results, affecting everything from the aesthetic finish to the long-term integrity of the installed structures.
It is notable that basements are often susceptible to moisture and temperature fluctuations. Thus, when framing a wall, one must consider using moisture-resistant materials or insulation methods to prevent potential damage later on. Additionally, basement spaces often require careful planning to incorporate necessary features such as electrical wiring and plumbing, reinforcing the need for an organized framing approach.
This guide will delve into the fundamental aspects of framing a wall in a basement, including essential tools, techniques, and best practices that can simplify the DIY process. Understanding these elements will ultimately empower homeowners to efficiently transform their basements into valuable living spaces, ensuring both functionality and aesthetics are optimized.
Essential Tools and Materials for Framing
Framing walls in a basement requires careful consideration of tools and materials to ensure a durable and efficient result. One of the primary materials needed for framing a wall is wood, typically either treated lumber or standard framing lumber. Treated lumber, often used for the lower sections of walls exposed to moisture, is essential in a basement environment to prevent rot and decay. Standard framing lumber, such as 2×4 or 2×6 boards, is commonly used for the vertical and horizontal framing structures.
In addition to wood, fasteners such as nails and screws play a significant role in securing the framework. It is advisable to utilize galvanized or stainless steel fasteners to combat potential rust caused by humidity levels in a basement. Alongside fasteners, metal brackets can provide extra support, especially for load-bearing walls or where additional stability is needed.
Insulation materials are also critical when framing basement walls. Rigid foam insulation or fiberglass batts are popular choices that help maintain temperature and reduce energy costs, contributing to an efficient diy basement finish. When selecting insulation, it is vital to consider moisture resistance; materials specifically designed for use in basements should be preferred to avoid mold growth.
For the finishing touches, materials such as drywall and joint compound are imperative. Drywall will provide a smooth surface for painting or texturing, while joint compound will enable seamless transitions between panels. When framing basement walls, proper ventilation should be ensured to allow moisture to escape. Paying attention to the properties of materials used in a basement can significantly enhance durability and overall performance while framing a wall. Selecting the appropriate tools and materials enhances the quality of work when finishing a basement and allows for a successful do it yourself framing project.
Understanding Wall Layout and Measurements
When undertaking a basement renovation project, particularly when framing walls, precise planning and measurements are crucial to achieve a successful outcome. This process begins with determining the optimal layout for your new walls, which will directly impact the overall functionality and aesthetics of the basement space. Start by evaluating the intended purpose of the finished area, whether it be a family room, home office, or an additional bedroom. Tailoring your layout based on this will enhance usability and comfort.
Next, accurately measuring the dimensions of the basement is essential. Utilize a tape measure to determine the length and height of each wall space where you plan to erect partitions. It is advisable to take multiple measurements to account for any inconsistencies, such as uneven floors or ceilings. Once you have the required measurements, you can move on to sketching a layout on paper, helping to visualize the positioning of the walls. This layout should include doorways, windows, and any built-in features to ensure they fit seamlessly into the design.
Once the plan is sketched, transfer the wall locations to the floor and ceiling by marking them with chalk lines. These marks serve as guides that will assist you during the framing process, ensuring that your walls are not only straight but also aligned with your initial design intentions. It is imperative to familiarize yourself with local building codes and regulations, as these may impose specific requirements regarding wall structure and safety measures. Compliance not only ensures that your project meets legal standards but also contributes to the safety and integrity of your finished basement.
Thorough planning within this initial stage of framing a wall can save time and materials in the long run. By understanding wall layout and taking precise measurements, you lay a solid foundation for your DIY basement finish project that adheres to safety regulations and achieves your design goals.
Attaching Bottom Plates to Concrete: Different Methods
When framing a wall in a basement, securely attaching the bottom plates to the concrete floor is crucial to ensure stability and prevent future issues. Several effective methods are commonly used, each with its advantages and drawbacks. The choice of method can depend on factors such as the tools available, the structure of the concrete, and personal preference.
One of the most popular methods is the use of concrete screws. To employ this technique, the bottom plate of the wall is aligned and drilled into the concrete using a hammer drill equipped with a masonry bit. Concrete screws, such as Tapcon screws, are then driven into the pre-drilled holes. This method is favored for its ease of use and strong hold. However, it requires a hammer drill and specific screws, which may not be readily available for every DIY enthusiast.
Another effective method is using adhesive. Construction adhesives designed for concrete provide a simple alternative for those who may not have the necessary tools for drilling. By applying a bead of adhesive along the bottom of the plate before placing it on the concrete, a solid bond is formed as the adhesive cures. While this method is cleaner and faster, its long-term holding capacity can vary depending on the quality of the adhesive and environmental conditions, making it less reliable than mechanical fastening in some cases.
For a more robust approach, anchor bolts can be employed. This involves setting reinforced bolts into the concrete prior to pouring the slab or using a hammer drill to insert the anchors post-construction. The bottom plates are then secured with nuts, creating a very sturdy connection. Although this method offers excellent strength, it requires more preparation and additional tools, which may not be ideal for all DIY projects.
In conclusion, when considering methods for attaching bottom plates, it is essential to evaluate the specific requirements of your framing project and the resources at your disposal. Each method has its pros and cons, so weighing these factors will help ensure the success of your DIY basement finish.
Framing Around Pipes and Beams
When undertaking the task of framing walls in a basement, one often encounters obstacles such as pipes and beams. Successfully framing around these structures is essential to ensure the stability and functionality of your DIY project. It is crucial to approach this aspect of framing a wall with both precision and careful planning, as improper techniques can lead to structural issues or difficulties in accessing necessary plumbing or electrical components.
The first step in framing around pipes and beams is to accurately measure the dimensions of the obstacles. This measurement will guide your decisions on how best to navigate around them while maintaining the integrity of your framing basement walls. Depending on the size and placement of the pipes and beams, you may choose to create a soffit (a drop ceiling box) or simply build the framing around the beams. Ensure that you account for expansion and contraction of the pipes during different temperature conditions, especially if they are heating or cooling ducts.
When constructing the frame around these obstacles, it is important to maintain proper clearance. A minimum of a few inches of clearance is recommended to allow for any maintenance work that may be required in the future. This principle not only aids in upkeep but also enhances the overall efficiency of your finishing a basement project. Use blocking as necessary to provide additional support where walls will be attached to the framed sections around the pipes or beams. A well-structured frame will support the wall and help in achieving a professional finish.
Lastly, remember to follow local building codes and regulations related to basement framing, as this will ensure safety and compliance in your DIY basement finish. By adhering to these guidelines and techniques, you can successfully frame around pipes and beams without compromising the overall quality of your project.
Constructing Door Frames: Techniques and Tips
Framing door openings in basement walls requires careful planning and execution to ensure functionality and aesthetics. To begin with, it is essential to select the appropriate standard door sizes, which typically range from 28 to 36 inches in width for residential applications. Understanding the space available is crucial, as it allows for the proper installation of the door frame within the confines of the basement’s existing wall structure.
Once you have determined the size of the door, the next step is to construct the header. The header serves to support the weight of the wall above the door, distributing it evenly to prevent sagging. For standard door frames, a double header, typically made from two pieces of dimension lumber, is recommended. Ensure that the header is constructed from quality material and cut to fit the width of the door opening, ideally extending at least 1.5 inches beyond either side of the door frame for stability.
To ensure the frame is square and level, measure diagonally from corner to corner of your intended opening. If the measurements are equal, the frame is square. Utilize a level to check the vertical sides and make any necessary adjustments before securing the frame in place with nails or screws. It is advisable to temporarily brace the frame until the door is hung and properly adjusted.
Finally, once the door frame is installed, consider adding finishing touches such as trim and casing, which enhance the visual appeal and provide a polished look to your framing project. Incorporating these tips will not only support the structural integrity of the door but also contribute to an inviting finish for your DIY basement finish, making the space more functional and appealing.
Framing Walls at an Angle: A Step-by-Step Guide
Framing walls at an angle can lend a unique aesthetic to your basement layout while also addressing specific space constraints. This process, while slightly more complex than traditional framing, can be tackled effectively with careful measurements and proper techniques. The first step in framing a wall at an angle is planning the layout. Measure the area where the angled wall will be installed, ensuring that you account for the desired angle and the total length of the wall. A common angle for angled walls is 45 degrees, but this may vary depending on design needs.
Once the measurements are clear, you’ll need to cut the top and bottom plates of the frame. For the angled wall, ensure that the ends of your plates are cut at the same angle as the desired wall’s slope. A compound miter saw is particularly useful for achieving precision cuts. After cutting, lay out the framing components on the ground with the studs placed vertically. Sturdy construction is vital, so ensure each stud is cut to the necessary length to meet the top plate at the correct angle, while also resting firmly on the bottom plate.
As you begin assembling the frame, use framing screws or nails to secure the joints. Keeping the integrity of the structure is paramount, especially in basements where moisture can affect materials more readily. It may be helpful to use a level throughout the assembly process to confirm that your angled framing remains straight and true to your design intentions. One key tip is to add diagonal bracing if the wall will bear significant loads, as this will enhance the stability of the structure. By following these steps carefully, framing a wall at an angle can be an attainable do-it-yourself (DIY) project that adds character and functionality to your basement.
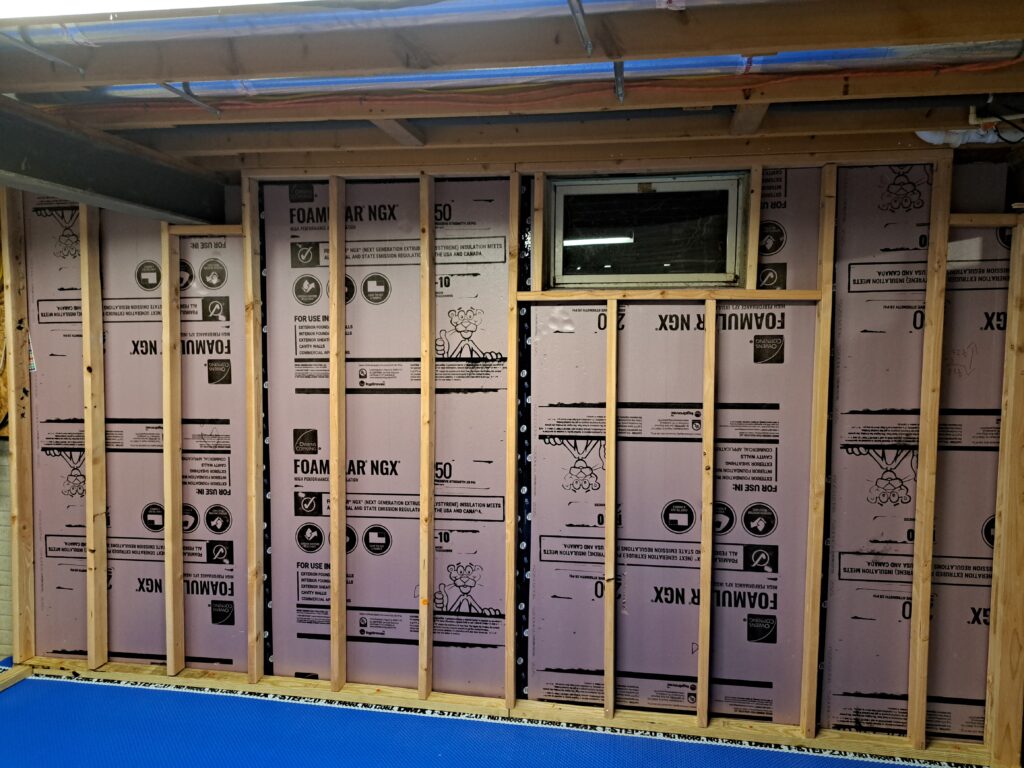
Insulation and Vapor Barriers: Importance in Basement Framing
When framing walls in a basement, it is crucial to address insulation and vapor barriers to ensure energy efficiency and moisture control. Basements are often prone to temperature fluctuations and humidity, making these components vital for maintaining a comfortable living space. Proper insulation not only keeps the warmth during cold months but also minimizes energy costs by reducing reliance on heating systems.
There are several types of insulation materials suitable for basement walls, including fiberglass batts, spray foam, and rigid foam boards. Fiberglass batts are commonly used due to their ease of installation and cost-effectiveness. However, for areas that experience high moisture, such as basement framing, spray foam insulation is often recommended. This option provides an additional barrier against moisture, expanding to fill gaps and cracks. Rigid foam boards are also an excellent choice, offering high insulation value with a durable, moisture-resistant exterior.
When installing insulation, it is essential to ensure it is fitted tightly against the framing for optimal performance. Gaps in insulation can lead to drafts and heat loss, undermining its effectiveness. Additionally, sealing any openings with a caulk or foam can help prevent air leaks, further enhancing the thermal barrier.
Equally important is the installation of vapor barriers. These barriers play a crucial role in framing a wall by preventing moisture from penetrating through the wall and damaging the structure over time. Typically made from polyethylene plastic, vapor barriers should be installed on the warm side of the insulation to minimize condensation. Failing to install a vapor barrier could lead to mold growth and wood rot, which can complicate your DIY basement finish project.
Implementing proper insulation and vapor barriers is a fundamental step in framing basement walls. This not only contributes to the comfort of the space but also protects the integrity of your investment in finishing a basement. Therefore, understanding and executing these components effectively is key to successful basement remodeling.
Pingback: Anchoring Walls in a Basement: Techniques for Securing to Concrete Floors and Steel Beams